My Workflow with Org-Agenda
I’m sure we’ve all had the same experience with “fully-featured” todo-list and project management programs: each had their own niceties, but none quite delivered on their promise. I’ve been using the built-in org-mode within Emacs for quite some time now, so I figured it was high time that I really made it my own.
I’m glad I did.
For the last year, many of my customization options were taken directly from the unbelievably detailed Guide by Bernt Hansen and remained unchanged for some time. However, the guide contained an overwhelming amount of information, which made it difficult to determine precisely what features I would find most useful.
Even if you don’t use this post for your own configurations, I highly recommend looking at Bernt’s exhaustive guide.
Even if you don’t use this post for your own configurations, I highly recommend looking at Bernt’s exhaustive guide.
I’m writing this short guide in an effort to introduce the features in org-mode which I’ve found I can’t live without. I’ll go over how I use org-mode, and it’s powerful built-in summary/calendar view known as org-agenda, in both my work and in my hobby projects. I also include some details about how everything was implemented, or at the very least provide the reader with references to understand my code. This guide is only an introduction to my workflow and is by no means self-contained (unlike Bernt’s)! Feel free to comment below or get in touch with me if you have any questions.
Org also has some nice export tools built in, so that I can easily share my notes with colleagues.
Org also has some nice export tools built in, so that I can easily share my notes with colleagues.
Org-Mode Basics
I use org-mode (or simply “Org”) for pretty much everything. I rely on it to keep track of my notes for work and hobby projects. I keep track of my upcoming tasks. It serves me with reminders for things like upcoming meetings and people I need to send emails to. It allows me to effectively log my time and provides an easy plain-text interface to quickly jot down notes and organize my thoughts. And it acts as a nice medium in which to implement many of the principles by the well-known productivity book Getting Things Done.
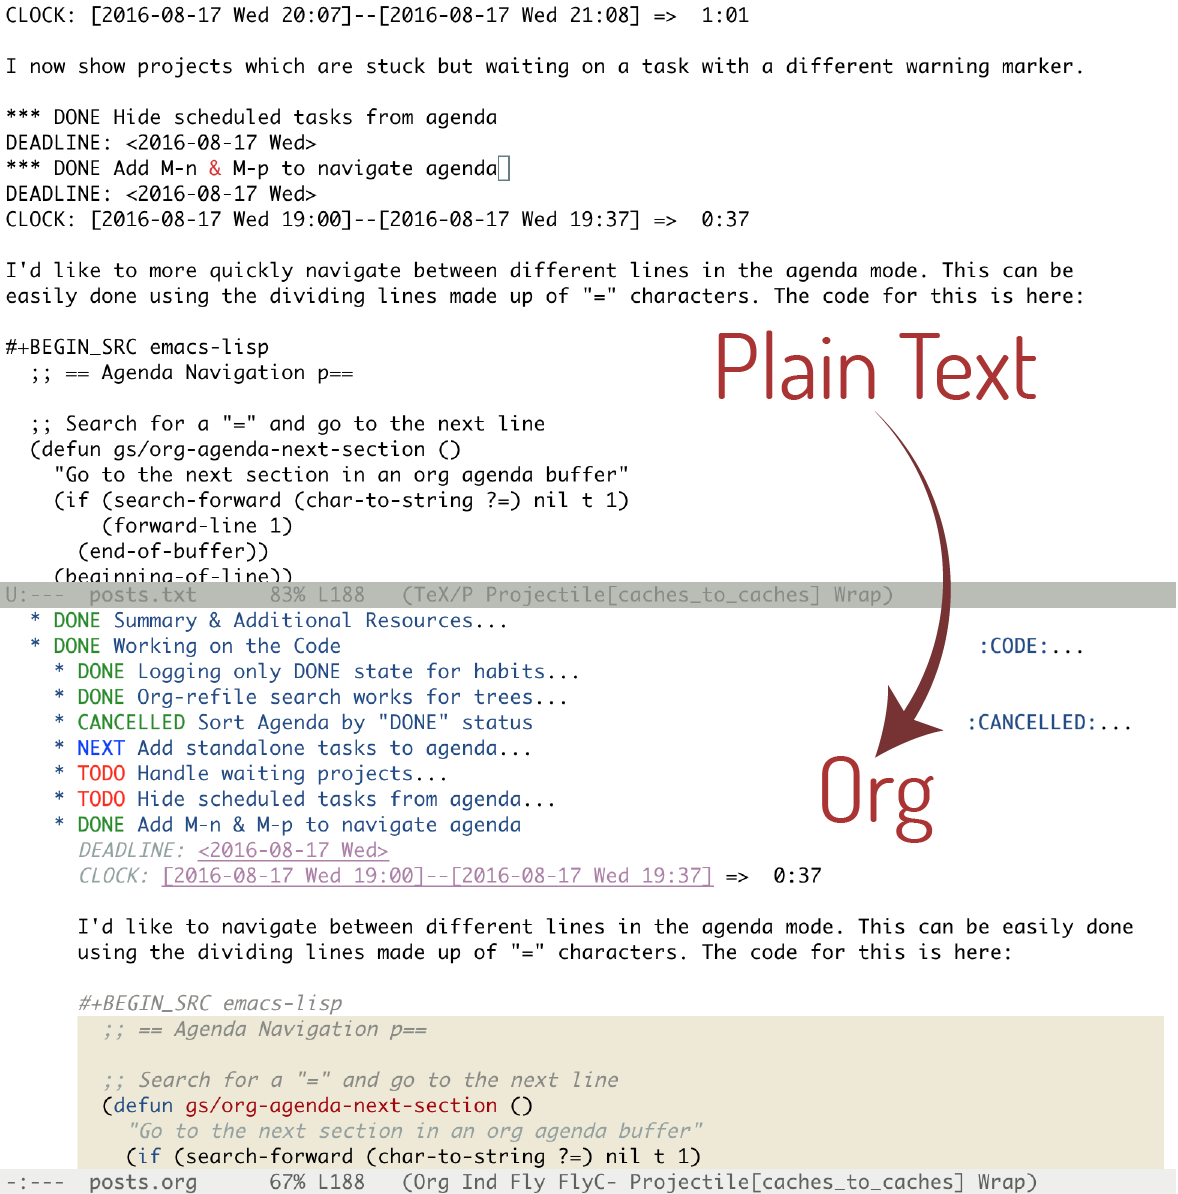
At first glance, Org looks to be a just a system for syntax highlighting with some extra features built-in for creating a hierarchy of headings and collapsing their contents for easy viewing and navigation:
In fact, Org is build on top of the Outline minor mode which it relies on for folding the different sections
In fact, Org is build on top of the Outline minor mode which it relies on for folding the different sections

However, there are a number of additional features which make Org a fully functional productivity tool. In particular, the built in calendar/agenda view will list outstanding TODO items, and collect scheduled tasks or tasks with deadlines and present them in a quickly readable form. If you really commit to working on projects within Org, it will help ensure that you never miss an outstanding task.
TODO Keywords
At its core, my workflow with Org is build around the idea of working through projects, which are set up as a series of “todo” items. Without any customization, Org allows you to assign a “TODO” or a “DONE” status to any heading , which you can see I’ve done in the image above. However, I’ve found that these aren’t typically expressive enough for handling very large projects. Following Bernt Hansen’s lead, I use the following keywords for my documents:
Keywords can be typed manually or added using the C-c C-t key binding.
Keywords can be typed manually or added using the C-c C-t key binding.
TODOUsed to indicate tasks and projects which need to get done (a “project” is any “TODO” heading with other “TODO/NEXT/DONE” headings underneath it).NEXTThis is for tasks which are to be done “next” within a particular project. Following the Getting Things Done principles, a project without a task marked as “NEXT” is considered “stuck” (but more on that in the next section).WAITINGWhenever I have a task that is waiting on someone else, I’ll assign it this keyword.INACTIVEAs an academic, I will occasionally have ideas or projects that I’ll want to get done eventually, but won’t have time to work on them at the moment. I typically use the INACTIVE keyword to signify that I’d like to come back to it eventually and I’ll occasionally search my files for “INACTIVE” projects when I have time.CANCELLEDThis is self-explanatory. If I’m working on something for a while, but it fizzles, it’s sometimes useful to mark it as cancelled.MEETINGUsed to indicate that I was meeting with someone. I’ll put meeting notes in headings with this keyword.DONEAgain, this is self-explanatory.
When changing between these states using C-c C-t, it’s possible to automatically prompt the user for clarification on what prompted the change. For example, whenever a task is set to WAITING, I have an opportunity to enter a short message detailing who I’m currently waiting on, and any additional information I may want to add. In addition, this command may also automatically add “tags” (e.g. :CANCELLED:) to the heading (tags provide some additional functionality for searching and organizing tasks). Tags are extremely useful for searching through .org files, and for using the agenda view.
The Agenda
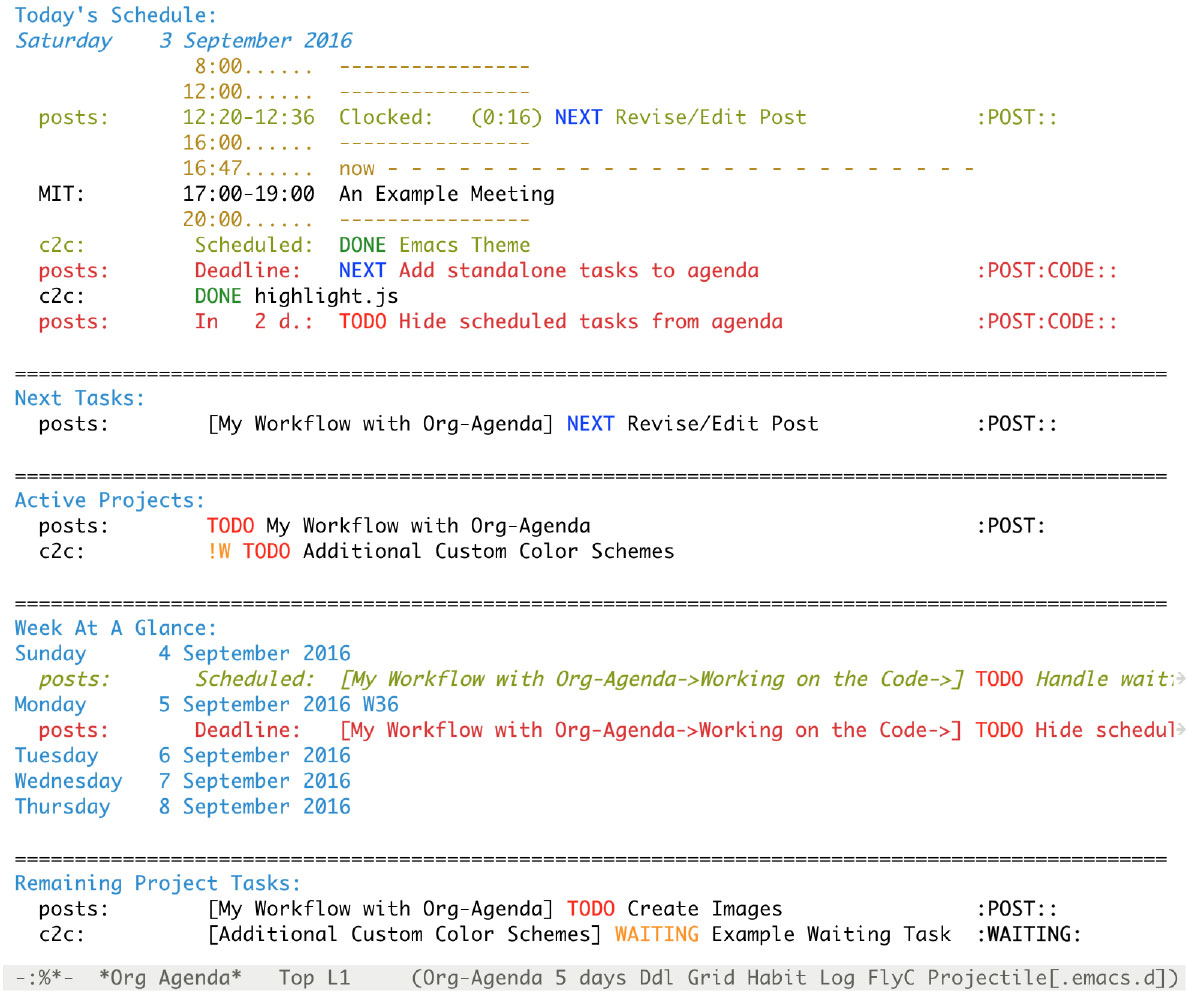
My favorite thing by far about using Org to collect my thoughts and keep track of my active projects is the agenda view:

The agenda view scans your .org files (set by customizing the org-agenda-files variable) and collects all of the headings with a TODO (or related) keyword. Without the agenda view, keeping track of projects, which I ensure are top-level TODO items, is difficult. The agenda provides a convenient way of tracking your projects and managing your calendar.
I’ve put quite a bit of work into getting the agenda to behave the way I want. At the top of the agenda is my “Today” view, which shows all of my appointments and deadlines for the day, as well as all of my clocked tasks (which I’ll talk more about in the next section. Then, I include all tasks marked as “NEXT”, which, once I’ve worked through all my items with deadlines, gives me other high priority tasks to chose from. I also have additional views for seeing my different active projects and other tasks associated with those projects.
I mentioned in the previous section that tags were useful, but its really in the agenda that this feature shines through. Pressing / in the agenda enables “filtering by tag”, so that only certain tags are shown (or excluded using -). Furthermore, there are ways (see Bernt’s guide for more info) to ensure that your “personal” tags are automatically filtered out during the work day, so that you don’t have to worry about pruning them yourself.
A similar sort of search of the text using regular expressions can be performed by pressing =.
A similar sort of search of the text using regular expressions can be performed by pressing =.
Automatic Clocking
Certainly having a way of viewing one’s appointments is nice, but what’s an agenda without some way of logging one’s time? Fortunately, Org has you covered once again, which has some extremely useful clocking functionality built-in. Using it is relatively straightforward, with only a couple of key bindings to remember for clocking in (C-c C-x C-i) and clocking out (C-c C-x C-o).
There are a few additional niceties which make this all worth doing. First, changing the state of the currently clocked task will clock out the time, which saves you from having to worry about it when you close out a task. As you might expect, the clocked entries will appear in your agenda view (as in the image above). The agenda view will also include the currently clocked task in the time-grid, allowing you to quickly change its state or clock out.
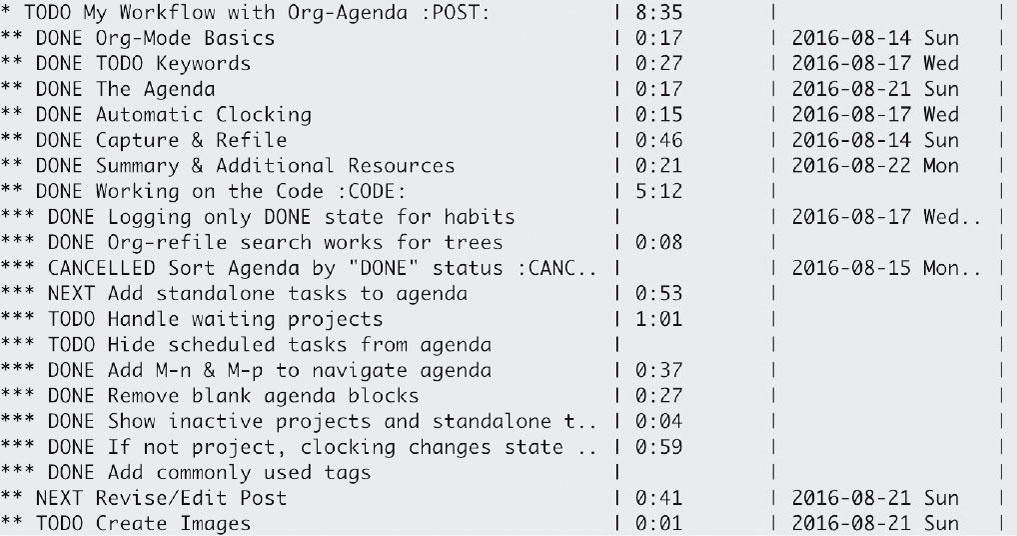
The last useful feature is the ability to view the total amount of time that you’ve clocked on a task using the Org “column view”. The built-in column view allows you to see certain properties of your tasks at a glance. My configuration file contains the following line of code to ensure that the time is shown in column view:
;; Set default column view headings: Task Total-Time Time-Stamp
(setq org-columns-default-format "%50ITEM(Task) %10CLOCKSUM %16TIMESTAMP_IA")
Once you’ve included this, activate org-columns with C-c C-x C-c while on a top-level heading, which will allow you to view the time you’ve spent at the different levels (you can exit the view by pressing q):

Capture & Refile
Putting everything together at this point may seem a bit daunting, especially during a traditional day, in which interruptions may be common, and scattered ideas punctuate work on any individual task. This is where org-capture comes in. Capture is extremely useful for quickly creating new headings and reminders when they arise. I typically bind it to C-c c.
The choices from the capture menu are set via “templates” stored in the org-capture-templates variable. In addition, one of the most convenient features about Capture is that it can automatically stop and restart the clock on your current task while you’re away (and log the intermediate time within the new heading).
My capture templates are as follows:
TODOThis is the basic task creation, and simply creates a new heading with a TODO keyword and a time stamp.MeetingThe ever-important meeting template, used whenever I have a meeting with someone. This can include scheduled meetings or, more commonly, whenever someone drops by my desk and wants to discuss something. Even if I don’t end up writing anything down during the conversation, this still automatically stops the clock on my current task, which I find extremely helpful.Diary- Inspired by the “Journal” template from Bernt Hansen’s guide, I use this template for one-off and unscheduled personal tasks. This includes my daily lunch break or whenever I go get coffee with a friend. Unlike the other templates, this created heading is placed within thediary.orgfile, and beneath headings corresponding to the year-month-day. I typically just leave this open while I’m away from my desk, and it’s rare that I look at these directly after they’re created.IdeaI often have random thoughts throughout the day that have nothing to do with what I’m currently working on and likely aren’t time sensitive. Whenever I have one of these ideas (whether it be inspiration for a blog post, or an idea for my work), I use this capture template.Next TaskWhenever I have something I quickly need to get done, including a one-off errand or responding to an email, I use this. It creates a heading with the NEXT keyword and (if that weren’t enough) a deadline for the end of the day. I try to ensure that all of these are done before I go to bed if possible.
This is all done with a few lines of emacs-lisp:
;; Define the custum capture templates
(setq org-capture-templates
       '(("t" "todo" entry (file org-default-notes-file)
	  "* TODO %?\n%u\n%a\n" :clock-in t :clock-resume t)
	 ("m" "Meeting" entry (file org-default-notes-file)
	  "* MEETING with %? :MEETING:\n%t" :clock-in t :clock-resume t)
	 ("d" "Diary" entry (file+datetree "~/org/diary.org")
	  "* %?\n%U\n" :clock-in t :clock-resume t)
	 ("i" "Idea" entry (file org-default-notes-file)
	  "* %? :IDEA: \n%t" :clock-in t :clock-resume t)
	 ("n" "Next Task" entry (file+headline org-default-notes-file "Tasks")
	  "** NEXT %? \nDEADLINE: %t") ))
At this point, you may be wondering “well how do I get the new heading where I want it to go?”. This is where the “refile” feature comes into play. After your new heading is created, press C-c C-w to activate refile. It will prompt you to type (with completion enabled) the heading path where you’d like to put the header. Simply press the return key when you’re done, and it will automatically move the heading where you want. To allow refile to work between files stored in the org-agenda-files variable, include the following line in you configuration:
(setq org-refile-targets (quote ((nil :maxlevel . 9)
                                 (org-agenda-files :maxlevel . 9))))
For this feature, I highly recommend using the Helm incremental completion engine. With this enabled, you can see the list of auto-complete (using fuzzy-search) options as you type, making it easy to quickly narrow down your refile target.
A fantastic tutorial for Helm can be found here: A Package in a league of its own.
A fantastic tutorial for Helm can be found here: A Package in a league of its own.
Summary & Additional Resources
During a typical day at work, I rely on all of these tools for project management. After spending some time in the morning reviewing my agenda and re-organizing my projects (if necessary), I start by tackling my upcoming deadlines and tasks which are marked for today. Once those are taken care of, I’ll chose a NEXT task (typically one with a :WORK: tag) and try to eliminate as many as possible before going home. When I’m interrupted by meetings, I start a MEETING with “Capture”. Whenever I have thoughts about something else I need to accomplish, whether work-related or not, I use “Capture” again. Though I’m far from proficient at this, I always try to clock my time and, at the end of each day, I’ll review how effectively I’m focusing my effort.
Feel free to contact me with any comments on this short guide, as well as with any questions regarding any of the details I’ve omitted. I also encourage you to git checkout my .emacs.d configuration, which I’ve annotated and put on my GitHub profile. If you’re interested in some more details on how to use Org and some of the additional features associated with it, you should peruse the following:
