Koding with Django
No, there’s no typo in the title. Koding is a nice platform for building code online. Today we’re going to be setting up a Koding instance, installing Django on it, and displaying its equivalent of a “Hello World” message.
Doing this on a Koding server has a couple of advantages. Not only are you using a fresh computer to do your development, something which is nice to do every once in a while, but you can develop your application collaboratively in real time, and use the Django runserver command to host web pages for short periods of time and show them off to your friends and family on the web.
Also, did I mention it’s free?
What is Koding?
If you haven’t already checked it out, Koding is a great way to get into developing web-applications. It’s a free cloud based integrated development environment (IDE) built around a Linux virtual machine. Essentially, using Koding gives you almost direct access to an Amazon Web Services t2.micro instance which sports a single virtual CPU, 1 GB of RAM and 3 GB of hard drive space. It’s great for testing small web applications, particularly if you want to show off your code or, as in the example we’re about to explore below, quickly host a page/application on the web without incurring any costs. Of course there exists a paid tier for people with more serious projects, but today’s little project will be far from needing more power.
Take the time now to create an account and get started on Koding’s website. Once you create your virtual machine [VM], we can begin working with Django.
Installing Django
Now that your Koding VM is spun up and ready to go, we’re ready to install Django. Python should already be installed, so that, when you type python into the terminal window, a message should pop up which resembles the following:
bashbashgjstein: ~ $ python
Python 2.7.0 (default, Apr 11 2014, 13:05:11)
[GCC 4.8.2] on linux
Type "help", "copyright", "credits" or "license" for more information.
>>>Type exit() and return to leave Python. If you prefer to use Python 3.4 (as I often do), I’ve included an extra section at the end of this post describing how to make that happen. Also, if you’re already pretty familiar with Django, feel free to skip this section and move on.
Let’s start by making a folder for our new Django project, which we will name hello_django, and then switch into our new directory.
bashbashgjstein: ~ $ mkdir Documents/hello_django
gjstein: ~/Documents/hello_django $ cd Documents/hello_django/We will be installing Django into a python virtual environment, which is useful in the long-term, as it allows you to use multiple versions of Django, Python and other packages on a single machine. To get started, we must first install the python-virtualenv package which is done with the following command in the terminal.
bashbashgjstein: ~/Documents/hello_django $ sudo apt-get install python-virtualenvNext, the virtual environment needs to be created and then activated, which is very simple to do with the package we just installed.
bashbashgjstein: ~/Documents/hello_django $ virtualenv venv
gjstein: ~/Documents/hello_django $ source venv/bin/activate
(venv)gjstein: ~/Documents/hello_django $Note the addition of (venv) to the prompt to signify that we are inside our newly created, and properly activated, virtual environment. Now, any of the python packages we install will exist only while this environment is active, allowing you to isolate your different projects from one another.
We’re finally ready to install Django. Fortunately for us, this is also very simple using pip, the python package manager:
bashbash(venv)gjstein: ~/Documents/hello_django $ pip install DjangoFinally, creating a Django application can be done with the newly installed django-admin.py startproject command:
bashbash(venv)gjstein: ~/Documents/hello_django $ django-admin.py startproject hello_djangoNow by switching into our newly created directory and using the ls command to show the files, we should see the following:
(venv)gjstein: ~/Documents/hello_django $ cd hello_django
(venv)gjstein: ~/Documents/hello_django/hello_django $ ls
hello_django  manage.py
The hello_django folder contains a number of files for your newly created Django project while manage.py will allow us to run some of the powerful functions built into Django.
Viewing The Webpage
Our Django application is now initialized and we’re finally ready to see our new webpage. Running the application is very simple with the built in runserver command, to which we will pass with the optional argument 0.0.0.0:8000 argument that will allow us to view the page over the internet with our own web browser. You should see something that looks like the snippet below:
bashbash(venv)gjstein: ~/Documents/hello_django $ python manage.py runserver 0.0.0.0:8000
Performing system checks...
System check identified no issues (0 silenced).
You have unapplied migrations; your app may not work properly until they are applied.
Run 'python manage.py migrate' to apply them.
March 23, 2015 - 20:16:11
Django version 1.7.7, using settings 'hello_django.settings'
Starting development server at http://0.0.0.0:8000/
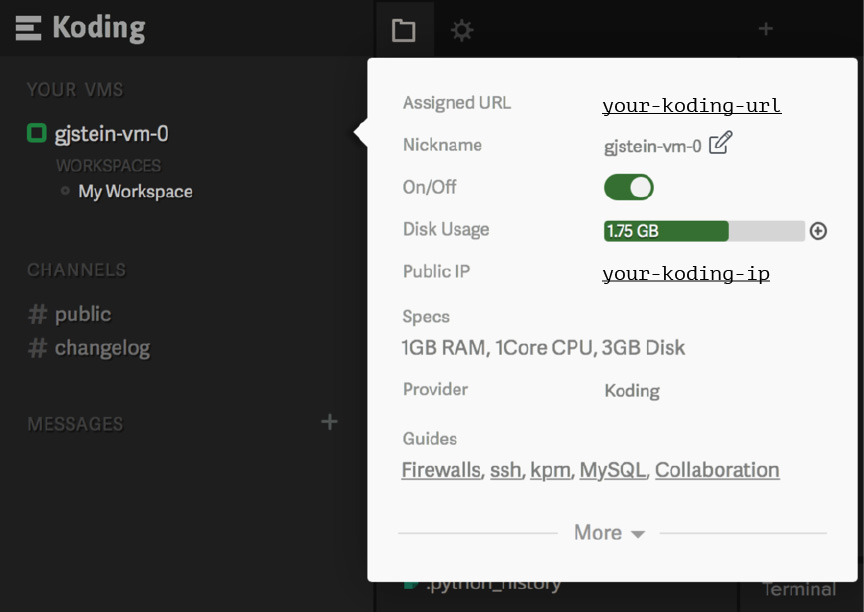
Quit the server with CONTROL-C.The ‘unapplied migrations’ warning is nothing to worry about and should be familiar if you’ve worked with Django before. Now that the server is running, we’d like to view our new page. To do this, we need to find the url (or the IP address) of our virtual machine. This can be found by clicking on the menu for our VM at the top-left of the page, as is shown in the screenshot below.

We can click on the link to the right of Assigned URL to take us to the root webpage of our VM. However, this is not the content we are hosting with our server, but, rather, it’s the default webpage that Koding provides. When we ran our Django server, you may recall, we hosted our page using the 0.0.0.0:8000 argument, which means that we are serving our application on port 8000. The details of this are not particularly important, but it does mean that we must append :8000 to our Koding assigned URL to see our page, so that http://XXXX.XXXX.koding.io should become http://XXXX.XXXX.koding.io:8000.

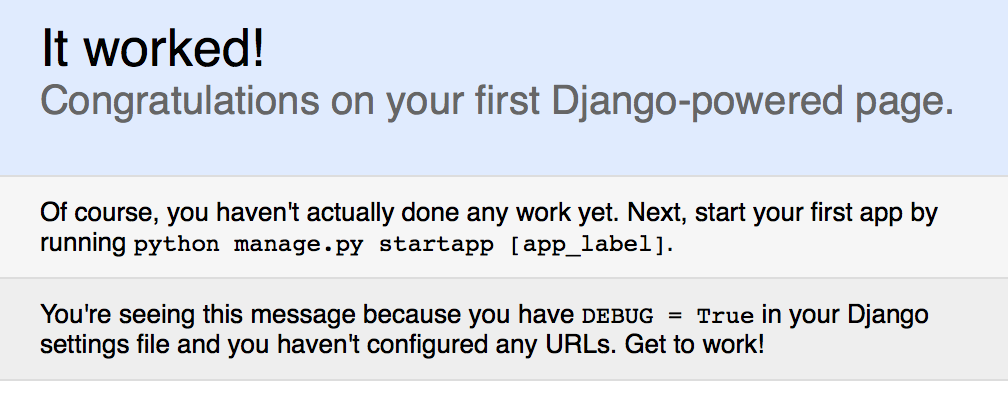
Once we make this change, we expect to see the classic “It worked” page that is served by a newly initialized Django application. Naturally, there’s not really much there yet. This is unsurprising, since we haven’t done any real work! Now it’s time for you to start building your application. If you haven’t seen the Django tutorial then now would be a great time to get started.
Welcome to Django!
Extra: Using Python 3
Some people prefer to use Python 3 with their projects (the current version at the time of this writing is 3.4.3), however, keep in mind that, since not every package will work with Python 3, this will depend heavily on your setup. There is only one quick change that needs to be made in order to get Python 3 working. The virtualenv package will take an optional argument, the Python version. In this case, the first line from the Start Virtual Environment listing above becomes the following.
bashbashgjstein: ~/Documents/hello_django $ virtualenv -p python3 venvNow, running the python command after activating the virtual environment will run Python 3 instead, and any Django projects created/run in the environment will match.
